Root Samsung Galaxy S3
Requirements
ProcedureStep 1: Download both Odin3 and CF-Auto Root packages from the link above. Extract the contents of the root package to a location of your choice.
Step 2: Launch Odin3, click the PDA button and select the .tar.md5 file that you extracted from the CF Root package.
Step 3: Make sure that Re-partition is unchecked in Odin3, and that nothing is selected in PIT.
Step 4: Turn off your Galaxy S III and put it in download mode by pressing and holding volume down+power+home at the same time, and then pressing volume up for confirmation.
Step 5: With your device in Download Mode, connect it to the PC using the USB cable. If all went correct, Odin3 will detect the device, indicated by a COM address in the top left corner of Odin3.
Step 6: Double check that the correct PDA file is selected and that re-partition isn’t checked, and hit the Start button to begin flashing the rooted kernel.
Step 7: Once the flash is complete, the phone will reboot and enter recovery mode, automatically initiating the rooting procedure. It will reboot once more.
Note: Do it in your own Risk...
How to Install Custom ROMs on Galaxy S3:
Download the preferred ROM and Google Apps (if applicable) from below and follow the instruction below carefully. But as I said above, your phone must be rooted and CWM Recovery installed on it.
- Download the ROM and Google Apps (if applicable) files. Not that both files come in zip with md5 checksums so do not extract them and copy to your phone’s internal or external (preferable) by connecting it to computer using a USB cable.
- Go to Settings> Developer Options and turn on USB Debugging Mode.
- Make sure your phone has a good battery level, if not charge it now. Also backup and sync your contacts, messages, apps, etc. Use these backup apps to backup data easily.
- Turn off your phone and reboot your phone into ClockworkMod Recovery mode. If you do not now how to do it, here it is: press and hold the Volume Up+Home (center) keys simultaneously and then hold the Power key. Keep the three buttons pressed till the screen turns up, the Samsung logo blinks for two times. Release the power key now but keep the other two keys pressed till you see a list of options in blue text on black background with Android bot.
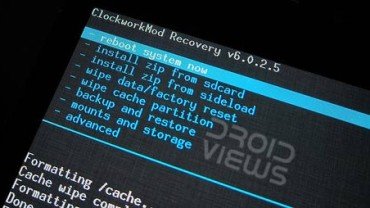
- In the Recovery the touch mode does not work, so you will have to use the Volume up and down keys to scroll and highlight and the Power button to select an option. If you have installed CWM Touch Recovery. you can operate it by touch input.
- The first and most important thing is to backup your current ROM. Scroll down to “backup and restore” option and select “backup”. It might take a few minutes for the backup to complete and it is a kind of assurance that you phone will be safe in case anything wrong happens.
- When it is done select go back option and choose “wipe data/factory reset” option and wipe it.
- Then go to “wipe cache partition” and wipe it.
- Finally, go to “mounts and storage” option and format data, cache and system.
- Return back to the main menu and select “install zip from sd card> choose zip from sd card” and select the ROM file that you copied to your phone in Step 1.
- When the ROM is installed, go back and install the Google Apps zip package the same way you installed the ROM in Step 10.
- Finally, go back to the main menu in Recovery and select ”reboot system now”.
Remember that the first boot after installing a new ROM takes much longer time than an usual boot. Sometimes it takes up to 10 minutes (maximum), so be patient. In case you phone does not boot properly and you are stuck on bootanimation even after 10 minutes, long press the power key. If it does not work for you, remove the back cover, pull out the battery, wait for a minute, reinsert the battery and try again. If you wish, you can go back to your previous ROM any time if you have made a back up as told in Step 6.
Phone Stuck at Samsung Logo?
In case your device is stuck on bootloop- that is, it does not boot normally, pull out the battery, boot your Galaxy S3 in CWM recovery, “wipe data/factory reset” and “wipe cache partition” and then reboot the device. You can also try reinstalling the ROM. Read our detailed
guide on fixing Bootloop here.
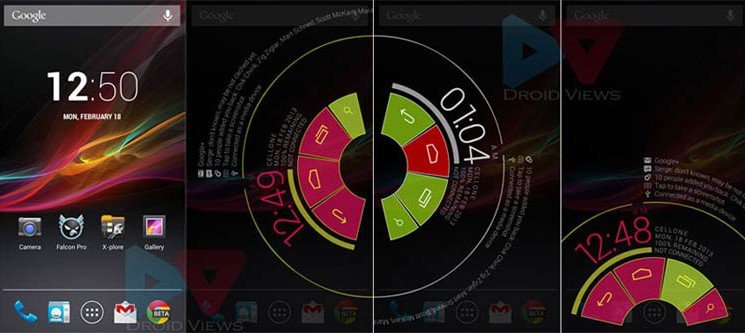
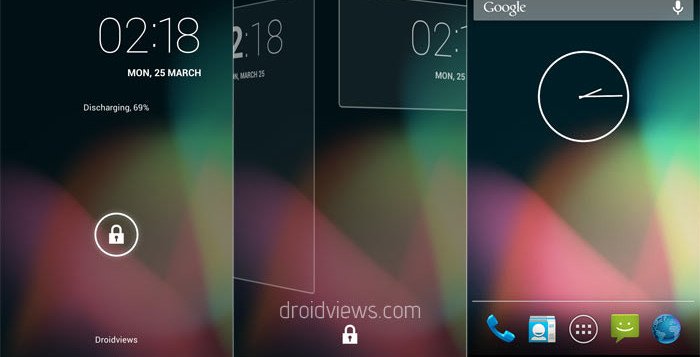
1. SuperNexus ROM JB 4.2.2
ROM Review:
The Super Nexus ROM is based on Android 4.2.2, the latest version of Android from Google. It is built for speed and smooth performance. As the very name suggests, the SuperNexus ROM gives you the feel of the latest and pure Android like it is found on Google Nexus devices.
Built from Google’s AOSP Source, the ROM is free of any bloatwares or third-party apps and it is very light-weight too. You get more free RAM and thus faster performance. When it comes to
battery backup, the Super Nexus ROM shines again. I charged my S3 early in the morning and on an average use with telephonic conversation, web browsing and sync on it showed 42% battery left when I returned home at 8 in the night. This was considerably better performance that I used to get with the stock Jelly Bean ROM.
Downloads:
Installation Guide: At the beginning of the post.
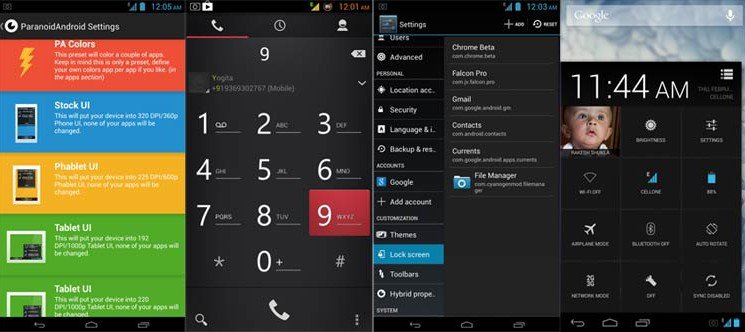
2. ParanoidAndroid ROM 3+ (now with Halo)
Developer: gokussjx -PA Team (
Donate)
ROM Review:
The ParanoidAndroid ROM is one of the most popular custom ROMs for the Galaxy S3 but for almost all Android phones. Its hybrid look and feel, smooth and fast performance and decent battery backup, all make it a hotspot for those who love custom ROMs. I spent the whole last week with the latest version of the ParanoidAndroid 3 and it was a whole new experience due to its flexibility, capability of customization and, most of all, the extended desktop mode with that beautiful Pie thing (see the screenshot above).
The PA ROM now comes with another innovative feature called Halo Notifications. Below is a video overview:
I have written a
detailed article that reveals all the aspect of this new avatar of the ParanoidAndroid ROM. It is based on AOSP 4.2.2 and also supports themes made for CyanogenMod 10.1.The ROM is almost bugless but the PA Team will have to focus on improving the battery performance a little. If you want to have a fresh new experience with beautiful looks, the PA3 ROM is just for you.
Downloads:
pa_i9300-3.60-11JUN2013-132157.zip
Installation Guide: At the beginning of the post.
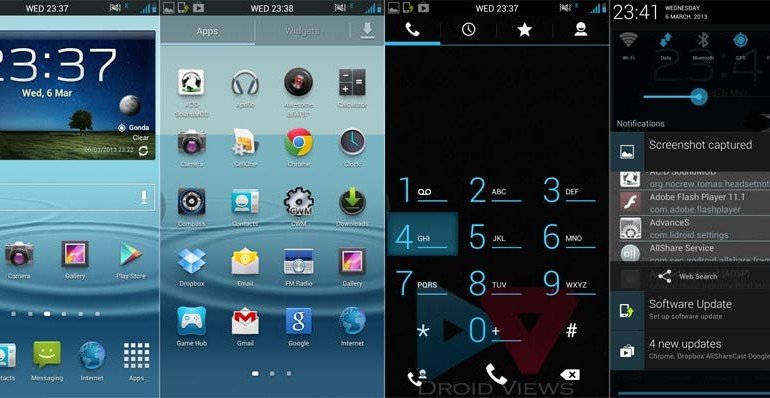
3. crDroid ROM
Developer: Cristiano Matos
ROM Review:
“THE EASIEST WAY TO HAVE ALL IN JUST ONE ROM PACKAGE.”
While most ROM developers are prone to strip their ROMs to achieve speed, smoothness and cleanliness, there are still few who prefer to be more and more inclusive. This is what XDA member
Cristiano Matos has done with the crDroid ROM for the Galaxy S3. A custom ROM without any third- party apps and even Google Apps can be as low sized as 100 MB, but when it comes to a ROM like crDroid, the size can be as huge as 1.21 GB.
So, what are the things that this giant ROM has, making is so heavy. It is a fully loaded ROM with 5 different kernels, all Samsung Apps/Bloats, stock TouchWiz launcher, crDroid TouchWiz 4 x 5 launcher, Motorola Atrix HD launcher, Xperia Z, Nova and Apex launchers and many others. Besides, the crDroid ROM also features 128 CSC’s (country/region codes), transparent widgets (such as AccuWeather, Fm Radio, Music Player), Multi-window with editable apps, Ink-effect lockscreen from Note 2, three pre-installed themes and option to choose from a host of other customization options. The best things is you can choose what, and what not to install. While installing the ROM via CWM, choose “Custom Installation” in Aroma installer.
As for the
battery-life, with the crDroid ROM for the Galaxy S3, it was good and lasted a whole day with average use. The ROM is based on stock Android 4.1.2 Jelly Bean firmware for the phone and feels smoother and faster than the original, thanks to the tweaks! I have not seen any custom ROM with so much options in Aroma. I really like my Galaxy S3 with all stock options with AOKP style TouchWiz and amazing performance.
Download:
ROM crDroid v14.0 XXEMA2- Android 4.2.1: Download MediafireROM crDroid v17.3 Aroma XXEMC3 - Android 4.1.2:
Download MediafireAdditional Installation Notes:
The crDroid ROM comes with a huge options to choose from while installing it. The ROM developer has left it to your disposal what you would prefer to see on your phone. Thus you can mix different elements and have them all on your phone. Use the installation tutorial given at the beginning of the post, but also take care that you select the custom installation mode when asked to choose in Aroma Installer.
The Aroma Installer will launch automatically. Agree to terms and conditions and press Next. When prompted, select “crDroid ROM Installation”. If you want to install stock Galaxy S3 ROM, select “Stock Install”, otherwise select “Custom Installation> Only Cache and Dalvik”and press “Next”. Then choose a modem. If you are not sure what to choose, directly press “Next”. On the next screen AI will ask you to choose a Kernel select either “Siyah” (for better battery) or “Stock XXEMA2″ and press Next. On the next screen you can choose what stock apps to install. You can uncheck the apps you do not want on your phone. Select only those that you think are important for you and press Next again. Then choose if you would like to have transparent widgets and choose a theme. In my case, I selected “JB Domination”. Then choose the launcher you would like to install. There are several other options you will have to choose, such as battery icons, notifications toggles, statusbar clock, browser, file manager, music player, etc. Finally, you will come to a screen with “Install Now” option.
Installation will take a few minutes to complete, so do not panic. When it finishes, pressNext> Finish.
4. FoxHound ROM Galaxy S3
Developer: raffaele88 (
Donate)
ROM Review:
The FoxHound ROM might prove an ultimate choice for you if you like a full-featured ROM with lots of settings options for customization. The ROM is more than 900MB in size and it is due to its inclusiveness. I have been using it for 4 days now and it has impressed me with its speed, smoothness and stability. Since it is installed through Aroma installer, you are more in control of things. You can decide what is good for you and installed the desired elements. You can choose from various custom recoveries like CWM, Siyah and Chainfire’s recovery. Moreover you can choose a suitable Kernel (I prefer Siyah). Then there are options for stock SGS3 and themed launchers like Nova, Apex, Nexus 4, etc. and the selection interface for apps you want to install.


The ROM features various performance tweaks and graphical changes and has a far better battery life compared to most ROMs. The best things that this ROM offers are found under device settings. Just explore the extensive settings and you will realize why I am talking about the FoxHound ROM in so hyped terms. The ROM also has OTA update feature and it notifies you whenever a new update is available.
Download FixHound ROM:
5. Carbon ROM
Developer: Carbon Dev Team
ROM Review:
I came to know about the Carbon ROM a few weeks ago but did not consider it for 2 reasons then- first, I thought it was like any common AOSP based ROM and second, it was in early stage with bugs and had issues. At the backend, however, I kept testing it. I would like to share one thing about this ROM. What I supposed was a commonplace ROM like any other, turned out to be a dark horse. I was surprised to see the potential and options for customization offered by the Carbon ROM.
A few days back I reviewed this ROM and I am sure that if you want an AOSP ROM for your Galaxy S3, this is an ultimate choice. Download the ROM and read the
full review here.
Downloads:
For good performance and stability, install the latest version from the “release” folder and to enjoy latest features, go with “nightly” version.
6. Omega ROM
Developer: Indie (Donate)
ROM Review:
The name of the 6th and last ROM in our list of some of the best ROMs for the Galaxy S3 GT-I9300 coincides deeply with the very meaning of “Omega” that is the 24th (2+4= 6th ROM) and last letter of the Greek alphabet and means “great”. It is a great ROM indeed. The developer has optimized the stock Samsung ROM to perform fast and with great stability while taking away all unnecessary bloats and yet maintaining the tru soul of the TouchWiz UX as we know it.
No theming, no extra bloats in the name of tweaking and performance boosting! If you want to use your Galaxy S3 with all those features you spent money for and even better stability, speed and battery life, Omega is just your final destination. Another good thing about the ROM is that most mods
like this for the device work superbly. Transparent AccuWeather widget, editable multi-window, ink effect, wallpaper scrolling are just some additional feature you can enjoy with Omega ROM installed on it.
The ROM is based off the latest Android 4.1.2 firmware for the Galaxy S3. Besides, there is another version of the ROM that lets you enjoy the optimized version of the leaked Android 4.2.1 JB firmware.
Downloads:
Download Latest Omega ROM Here: Link